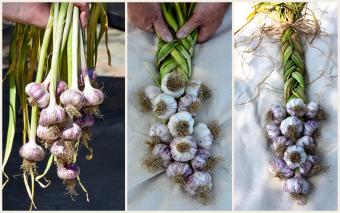
Properly harvested garlic, provides you with the whole plant, including the leaves, stem, bulbs, and roots. You are now ready to cure the bulbs so you can store them long-term to use as needed.
How to Cure Garlic for Storage and Seed
You will cure all the garlic at one time. Once it is cured, you can divide out the bulbs you want to use next year for seed garlic.
Sort Garlic
The first thing you need to do is sort the garlic. You will separate it for easier processes as it goes through the curing process.
- Spread harvested garlic on a dry flat workspace.
- Work carefully to remove clumps of dirt clinging to the bulbs and roots without damaging the bulbs, leaves and roots.
- You want to leave the roots and leaves/stems attached to the bulbs while they cure.
- One-by-one inspect the bulbs for bruising, missing cloves and malformed shapes.
- Place these in a separate group for curing. You'll use these first instead of storing.
Drying Garlic to Cure It
With each curing method, you must dry the garlic. This process is vital since the stored energy in the leaves and roots will rush to feed the garlic bulbs in a final act of survival. That burst of energy provides powerful nutrients that give garlic its most pungent flavor.
- The ideal temperature needed when curing garlic is 75°F-80°F although some gardeners report temperatures as low as 50°F have produced excellent garlic.
- The air needs to flow all around the garlic to ensure even drying. You can add a fan to assist in air circulation.
- Large bulbs contain more moisture and require longer to cure.
- Protect garlic from rain and humidity.
Choose a Method to Cure Garlic
There are two methods you can use to cure garlic: using a screen or hanging. Which one you choose depends on how much garlic you need to cure and what kind of space you have for the curing process.
Screen Drying Method for Curing Garlic
A popular method, especially for small plots of garlic, is to cure garlic by drying it on an open screen. You will need to set up your screen in a well-ventilated, warm, dry space. This can be a storage room, pantry, garage, or outdoor garden shed. Avoid drying garlic on a flat table surface that doesn't allow air flow all around, including the bottom.

Supplies
- Framed screen, large enough for amount of garlic to dry (use more than one if necessary)
- 2 sawhorses or tables
- Oscillating fan
Instructions
- Set up the screen frame between a pair of sawhorses or between two small tables by positioning it so air can flow through the screen and all around the garlic.
- Keep the garlic out of sunlight, rain and other weather elements.
- Spread out the garlic (bulb with leaves and roots intact) onto the screen(s).
- Set up the oscillating fan so air circulates through the space.
- Allow the garlic to remain undisturbed for three weeks, longer for large bulbs (two-three more weeks, depending on size and conditions).
- Check on drying progress once a week.
- Stop drying when the paper-like wrappers around the bulbs become dry. The cloves inside will still retain moisture.
How to Hang Garlic to Dry Out and Cure
You can dry garlic by hanging it up, the same way commercial growers do. If you don't have a barn, you can use a shed, garage, hoop house, or even a pantry, depending on the size of your garlic crop.

- Collect bunches of garlic together, around 6-8 plants per bunch.
- String these together by tying the leaf sheaths together, careful not to separate the leaves from the garlic neck and stem.
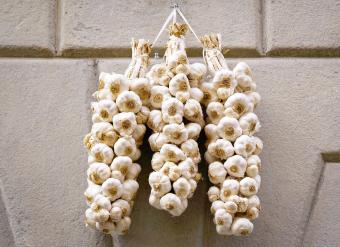
- You can braid garlic stems at this time to hang for curing and to store (see instructions below for braiding garlic).
- Hang the strings of garlic from the ceiling or from racks and drying lines so air can circulate all around them.
- Keep the garlic out of direct sunlight.
- Set up an oscillating fan if the barn doesn't have good air flow. For an indoor space, use an oscillating fan to ensure enough air is moving around the space.
- Leave the garlic hanging for two weeks. Larger bulbs may require three-four weeks or longer to cure.
- The drying time can vary according to temperature and humidity within the drying spaces, especially if you're drying in a barn or shed.
How to Braid Garlic for Curing
You can create an awesome look when you weave a garlic braid. This is one way you can hang garlic to cure. Once cured, your garlic braid can quickly become a cool conversation piece, especially if you hang it in your kitchen for easy cooking access.

Collect Supplies
- You want to carefully select the garlic bulbs to add to your braid.
- Soft-neck garlic is the easiest type of garlic to braid, although hardneck garlic is often used.
- Select 20-30 garlic heads with stems and leaves still attached. You can use more or less garlic depending on length of braid desired.
- Collect scissors, string or twine.
Instructions
- Cross two stems so the bulbs touch each other.
- Place a third garlic in the middle on top of the other two, with its stem in the center.
- Tie the stems together with a piece of string (trim excess with scissors).
- Add another garlic on the left side of the arrangement and place the stem over the center stem.
- You can then cross the right stem over the center to braid it into place and move the new stem into the center position.
- This is the foundation for your braid.
- You'll add one garlic at a time, alternating from left, right, and center.
- Each time you add a garlic, you want to align the stem with the center stem.
- You'll take the stem of the garlic from the side opposite the one you just added and draw that stem over and across the center stem.
- The stem you crossed over now becomes the new center stem.
- Continue to work your way up the braid by alternately placing bulbs on the left, right, and center.
- If you're making the braid for curing garlic, leave the roots intact until the curing is finished. You can then trim the dead roots with a pair of scissors.
- Some of the dried paperlike natural wrappers may need to be rubbed free for a more attractive looking braid since they may still have dirt on them.
Braiding Garlic After Curing
If you wait to create a braid after the garlic has cured, the stems will be less pliable and will possibly break. You can reconstitute the stems for easier manipulation.
How to Make Dried Stems Pliable
You can wrap the garlic stems in wet paper towels or a wet towel.Be careful not to get the bulbs wet or bruise them in the process.
Breakdown Dried Garlic Stems
Once the stems have soaked up some of the moisture from the towels, you can use a rolling pin to break down the stems. It may take several hours for the stems to become pliable enough to work into a braid. This extra effort is why most gardeners create braids as part of the curing process instead of creating after the garlic has cured.
Clean Cured Garlic
Your garlic is finished curing when the bulb wrappers become dry and brittle. You want to clean up the garlic before storing.
- Cut the stem from the garlic bulb with a pair of scissors about 1" from the bulb.
- Cut the roots from the bulb leaving about ½" attached to the bulb. Be careful not to cut or bruise the bulb.
- Remove the first layer of wrapper by rubbing your hands over the garlic. This will remove any remaining dirt clinging to the bulb.
- Never use water to clean cured garlic bulbs.
Select Seed Garlic
You can now select the garlic bulbs you wish to use for next year's planting. Choose bulbs that are large and plump. You don't want to use damaged or malformed bulbs. Decide how many garlic bulbs you need since you'll be planting individual cloves. Place seed garlic in a separate storage container and/or area than the bulbs you wish to eat.
Short-Term Storage
The malformed and damaged garlic bulbs are the ones you'll use first. Place these where you can access them easily.
Long-Term Storage
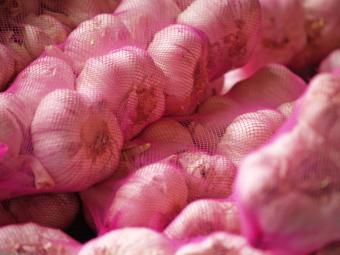
Store garlic bulbs in mesh bags. Mesh bags come in all shapes, colors and sizes, but long tubular ones are very popular for hanging from a pantry wall or side of cabinet. An old-fashioned way to store garlic is inside brown paper lunch bags or shoe boxes. Punch small holes in each for good ventilation.

- Store garlic in a dark, dry place.
- The ideal storage temperature is 40°F.
- Periodically check stored garlic to ensure it has not sprouted. If garlic begins to sprout, use it immediately.
Use a Food Dehydrator for Drying Sliced Garlic
You can use a food dehydrator to cure garlic in record time. The main challenge is the taste of garlic since you won't have the benefit of the energy sent to the bulb by leaves and roots during slower curing methods. In addition, this method is labor intensive for large crops.
- Separate cloves from the bulbs.
- Peel cloves.
- Cut garlic cloves into thin slices using a food processor or mandoline.
- Spread garlic slivers onto dehydrator trays.
- Set temperature to 115 °F and leave for 36-48 hours until garlic pieces are crisp.
- Test for dehydration by breaking garlic slivers in two. If the slice bends and doesn't snap in two, it isn't completely dehydrated.
- Return the garlic to the dehydrator for 15-minute intervals until all moisture is gone.
- Store in an airtight container.
- Reconstitute by adding water.
- To make garlic powder, place the garlic slices in a food processor and set to pulse until pulverized into a powder.
- Store garlic powder in airtight containers.
Learn How to Cure Garlic for Long-Term Storage
It's easy to cure garlic for long-term storage. Cured garlic can be stored for six to eight months, providing more flavor options for meals.


